Scott Guthrie just announced on his blog that many of the demos that he presented during the PDC keynote are now available online. Both the demos and their source code are now online and available for you to download. Be sure to go grab the code and check them out!
Learn More: If you are interested in learning more about the features in Silverlight 4 beta, grab the Silverlight 4 Technical Whitepaper here. You can also walk through some hands on labs and other learning materials from both:
I decided to break down the project for the HTML Hosting & Puzzle application for those who are interested in how it works.
What does it do?
This project demonstrates many features, including these features:
- Multi-Touch gestures
- WebBrowser control
- HTML Brush
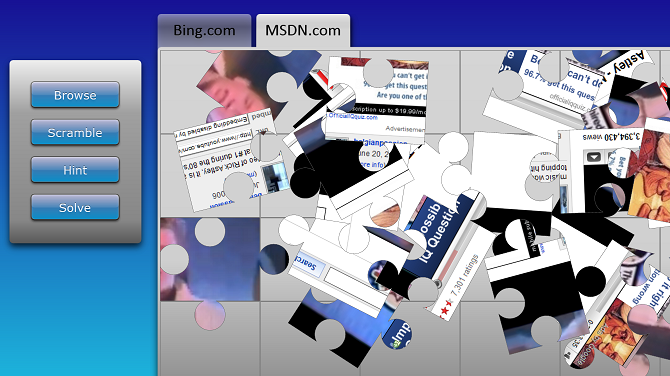
The HTML Hosting & Puzzle application shows off using the new Silverlight 4 WebBrowser control in an out of browser application (note: you must run the application out of the browser for it to work). It allows you to use the control both interactively (meaning you can click the HTML within it and run it like an application). It also allows you to use the hosted HTML as a brush that you can apply to other Silverlight controls. For fun you can click the second tab and you’ll get rick-rolled to YouTube. You can still use the HTML as a brush and carve it up into a jigsaw – even though the video is still playing (using
Flash hosted within the HTML). Also, if you have a multi-touch device, you can use your fingers to drag and rotate puzzle pieces.

The Solution Explorer
The project is named SLMTPuzzle (Silverlight Multi-Touch Puzzle) and contains a set of images, a generic.xaml for some custom controls, and a series of Views and code files for the puzzle logic.
Vector.cs
The Vector struct is used in presenting the motion for the puzzle pieces.
TouchProcessor.cs
This contains a helper class, TouchProcessor, and several other helper classes that capture and process touch events. This is not required for multi-touch, but make sit easier to process the events.
PuzzleDesigner.xaml
This control is actually not used in the project and can be excluded from it. I used this control simply as a design surface to create the puzzle pieces and make it obvious what shapes I needed. Notice that there are 9 shapes for the puzzle pieces. With these 9 shapes a puzzle of various larger sizes can be created. For example, in a puzzle that is 6 across the top and 3 tall (18 pieces in total), the top center piece would be used 4 times as would the middle and bottom center pieces.

Drawing the puzzle pieces was quite simple using Expression Blend. I put the basic steps to create the “Top left” and “Top center” puzzle pieces here:
1. Make the container object a Canvas (Grid panels can resize and stretch, which we do not want in this case)
2. Create a rectangle of the width and height you desire. Set the fill color to yellow.
3. Add a circle using the ellipse tool. You can make it a circle by holding the SHIFT key down while sizing the ellipse. Set the fill color to green. (Note the size of the circle, we’ll be using this again later)
4. Copy and paste the circle shape to make a duplicate. Set this circle’s Fill color to red. (The colors are simply for demonstration purposes.)
5. Place the red circle on the right side of the rectangle and the green circle on the bottom of the rectangle. Make exactly about a 3rd of the circles overlap the rectangle. Your control should look something like this:

6. Select the 3 shapes.
7. Right click the selection and choose from the menu Combine | Unite. The shapes are now combined into a single path as shown below. The circles became the nubs for the puzzle piece.

8. This puzzle piece could now work as the top left piece. Now that it is created, let’s create the top middle piece, so copy the entire piece and paste it to create a duplicate. Set the Fill of the new piece to Blue.
9. Align the 2 pieces as shown below.

10. Set the canvas’ background to white. This will make it easier to see if the puzzle pieces align properly.
11. Create another circle with the same exact size as the puzzle nub you created in step 3. Set its fill color to Red.
12. Position the red circle directly over the right nub of the yellow puzzle piece.

13. Position the blue puzzle piece adjacent to the yellow puzzle piece.

14. Now it is time to carve a shape out the blue puzzle piece so the yellow puzzle piece can fit it. select the red circle and the blue puzzle piece.
15. Right click and from the menu choose Combine | Subtract. This subtracts the red circle from the blue path. The results should look as follows:

16. Notice the puzzle pieces fit together and can be pulled apart as shown below.

This process can be repeated to create various shapes of puzzle pieces. Of course, you can get much more creative in creating puzzle pieces, but this is a simple way to get started. The paths for these shapes can then be used as the basis for the puzzle pieces.
HtmlPuzzlePiece.cs
The puzzle pieces themselves are represented by the HtmlPuzzlePiece custom control. This custom control contains all of the logic necessary to handle the events and motion for each puzzle piece. Each puzzle will contain many instances of this control, using various paths to shape the puzzle pieces.
HtmlPuzzle.cs
The puzzle is represented by the custom control HtmlPuzzle, which handles various events and actions such as:
- Navigating to a web address to display the HTML content in the WebBrowser control
- Redrawing the HTML content using the HtmlBrush in the puzzle pieces
- Setting the redraw rate to 60x per second
- Toggle the state between the WebBrowser control (interactive HTML) and the HtmlBrush mode (for video)
- Scramble the puzzle pieces
- Solve the entire puzzle
- Solve one piece of the puzzle (hint)
As you can see, the HtmlPuzzle custom control is where the bulk of the interaction is handled.
MainPage.xaml
This is the main user control that loads the WebBrowser control or the puzzle (through the HtmlPuzzle control). It has a button which toggles the state for the HtmlPuzzle control between the WebBrowser control (the Browse button) and the puzzle ( the Puzzlify button).
“Browse” mode

“Puzzle” mode

InstallView.xaml
The InstallView control is shown when the application is run inside of the browser. If the application is not installed out-of-browser the InstallView control will allow the user to install the application by clicking a button, as shown below:

If the application is installed out-of-browser already, the InstallView control will alert the user and disable the Install button. Again, the InstallView control is only displayed when running in browser.
Auto-Updates
The application automatically checks for updates and, if found, retrieves the update and alerts the user to close and re-open the application to get the update. The code is quite simple to do this … simply handle the App.Current object’s CheckAndDownloadUpdateCompleted event, check for the update, and in the event handler alert the user (see the code below).
public MainPage()
{
    InitializeComponent();

    int refreshInterval = 33; // ms
    _timer = new DispatcherTimer() { Interval = TimeSpan.FromMilliseconds(refreshInterval) };
    _timer.Tick += new EventHandler(timer_Tick);

    this.Loaded += new RoutedEventHandler(MainPage_Loaded);
    App.Current.CheckAndDownloadUpdateCompleted += CheckAndDownloadUpdateCompleted;
    App.Current.CheckAndDownloadUpdateAsync();
}

private void CheckAndDownloadUpdateCompleted(object sender, CheckAndDownloadUpdateCompletedEventArgs e)
{
    if (App.Current.IsRunningOutOfBrowser && e.UpdateAvailable)
    {
        MessageBox.Show(
            "A new update is available for the Multi-Touch Puzzle. Please close the application and restart it to install the latest update.",
            "Multi-Touch Puzzle Update Available",
            MessageBoxButton.OK);
    }
}
Wrap-Up
That’s the application from a high level. The logic to rotate the pieces, give accelerate and decelerate them when moved, and to scramble & solve them is a little more involved. But the code is here so you can dive in and follow along to understand these aspects. If you have any questions please drop me a comment or an email. Once again you can download the entire sample from here.
NOTE: This application requires Silverlight 4 Beta


