This is Part 3 of my series on setting up my blog for Orchard CMS. In this post I will share my experience importing my old blog posts from the BlogML format into Orchard and setting up rewrite rules.
Note: If you have not read Part 1 or Part 2, I suggest you go check them out first(The links are in the table below).
| Walking Through the Orchard Part 1 – Setting up a Blog |
| Walking Through the Orchard Part 2 – Conversion from Graffiti |
| Walking Through the Orchard Part 3 – BlogML Import |
| Walking Through the Orchard Part 4 – ??? |
In Part 1 I set up the new Orchard blog and left it in a fundamentally empty state. In Part 2 I converted my old posts from Graffiti CMS to the BlogML format. The BlogML format is basically a standard XML format for blog content that Orchard (and other blogs) can import.
Hindsight is 20/20
I wish I had checked my tags and slugs more closely before after I exported them from Graffiti to BlogML. It would have saved me some cleanup time later on. Since hindsight is 20/20, hopefully I can save you some of that pain by reminding you again to check your BlogML file and make sure it is right before you go any further. If by chance you import the data and find it does not look right in Orchard, it really is not that hard to start over with Orchard as I show in Part 1 of this series. It only takes a few minutes. You can of course try to clean the data up on your own, but for the 10 minutes it might take you to start over, its probably not worth it. Your call of course.
Install the BlogML Module
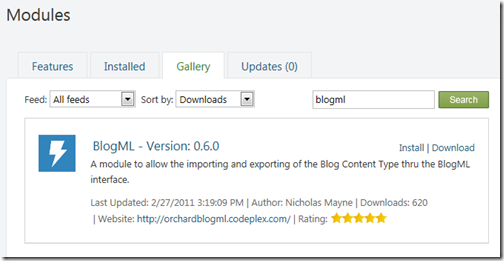
Importing BlogML is pretty easy once you install the BlogML module for Orchard. I did this in Part 1 of this series, but since modules are pretty core to Orchard I’ll demonstrate quickly how to install this module. First, go to the Orchard administrator dashboard and click on the Modules item. Then click the Gallery tab item and search for the module BlogML. Then click the Install link (or download it and then go to the Install tab and install the module later).
Once this module is installed you can start the import process.
Note: When you install modules, some are disabled and others are enabled. The easiest thing to do is to go to the Modules item in the dashboard, click the Installed tab and look for the grayed out modules (gray denotes disabled). You can enable and disable modules right from there.
Importing the BlogML Data File
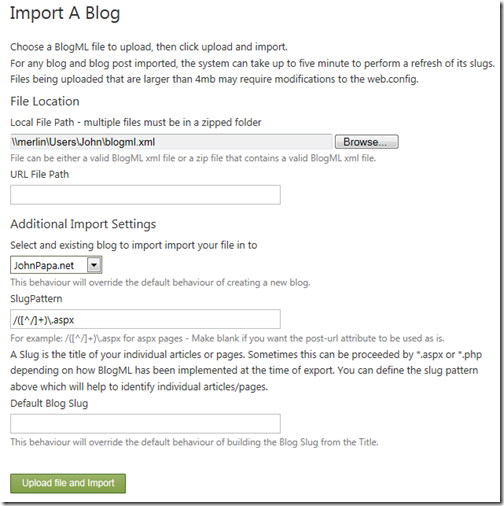
Once the BlogML module is installed you can import the data file by going to the dashboard and selecting the Blogs link. This brings up the Import a Blog page as shown below.
Click the Browse button and locate and select the data file you want to import. You can choose the blog you want to import the content into from the selection box. Then you can start the import process by clicking the Upload file and Import button. This took about 4 minutes for my blog, which I was pretty happy with.
I’ve got a Blog with Posts and Comments and … Uh Oh …
At this point I was thrilled that my blog was up and running (locally) and my content was all there. Images ported over, posts, comments, it looked good. I already mentioned a few of the issues I ran into in Part 2 of this series when I exported the data. This is when I realized some of them. I could have fixed them, created a new blog and reimported, but I decided to try to fix them from here (probably not the best choice). Everything worked out OK and I learned a lot about the data storage in Orchard too.
Note: For those interested, I included some tips on Part 2 of this series on how to clean up some of the problems I hit such as how my comments were all surrounded with the <p> tags.
There were a few other issues which many of you might hit too, so I’ll try to cover them here and hopefully save you some time.
Rewrite Rules
On my previous blog site in Graffiti my posts used categories like Silverlight, Personal, Reviews, or NET. In Orchard I don’t use categories at all (I never liked them anyway). This caused the slugs of my posts to look different in Orchard than they looked on my old site. For example, the link for my post on Silverlight TV episode 60 was /silverlight/sltv63 on my previous site and in the new Orchard one it was going to be /sltv63 . I have hundreds of posts and I certainly want the links not to be lost. Not only would people who bookmarked them lost the posts, but the search engines would be looking for the old links for a while too. Luckily these problems can be solve using rewrite rules.
Rewrite Rules is, you guessed it, another module you can install. Once installed, I started writing some rules and quickly realized I had either done something wrong or I had hit a bug. Unluckily for me it was both. However, luckily for me Sebastien Ros, the guy on the Orchard team who wrote the Rewrite Rules module, was very responsive. In fact, he fixed a bug in the module while on the phone with me and republished it (seriously, in like 10 minutes!).
In case you hit it too, the error I ran into was yielding this message:
The transaction specified for TransactionScope has a different IsolationLevel than the value requested for the scope. Parameter name: transactionOptions.IsolationLevel
To avoid this error make sure you have the Rewrite Rules module version 1.1.1 or later.
But more importantly, he helped me understand what the rewrite rules were doing, how the syntax worked, and he gave me some tips for helping the search engines find me. So what are my rewrite rules? Let me show you and then I will explain them. First, assuming you have the Rewrite module installed you need to go to the administrator Dashboard and choose the Settings item. When you scroll down the page you will see the Rewrite Rules Settings. Enable them by checking the box and enter your rules.
Here are some of my rewrite rules:
RewriteRule   ^silverlight/(.*)/?$  /$1 [R=301, NC]
RewriteRule   ^all/(.*)/?$  /$1 [R=301, NC]
RewriteRule   ^football/(.*)/?$  /$1 [R=301, NC]
RewriteRule   ^musings/(.*)/?$  /$1 [R=301, NC]
RewriteRule   ^personal/(.*)/?$  /$1 [R=301, NC]
Let’s pick this apart. Each rewrite rule is on its own line. Each rules starts with the keyword RewriteRule and is followed by the regular expressions. The first rule says anyone looking for a url with silverlight/ in it should simply remove the term. The arguments in the square brackets indicate options for the rules. The NC tells the rule to ignore case (not case sensitive). The first time I wrote the rule I did it like this below …
RewriteRule ^silverlight/(.*) /$1 [NC]
The problem here is that I did not cover the condition where there might be a trailing slash on the url. So this did not work. One of the other tips Sebastien gave me was to also include R=301 in the options. This helps web servers know that my link has changed. Huh? Without the R-301 my site will be redirecting the pages for a while. With the R=301 option my site will redirect the link but also help in search optimization of my site.
Posts as Pages
I had a few posts in my old site that I used as static navigation items off my main menu. These were Articles, Tutorials, and About. You can see that I brought them over to this site too. These pages worked fine in the new site, however I had 2 problems to tackle. The first is I wanted to turn off the comments for those pages (it was off in the old site already) and the second was to create a navigation item in my site’s header for them. Both were easy. One option I had was to create a brand new page for these and copy the content to them. I could just as easily have done that, but I decided to keep the posts instead.
First, I went to the dashboard and selected the Manage Blogs item, then found the 3 posts. For me it was easy because they were the first 3 (so I went to the last page). However, this alerted me to an issue I hope the Orchard team will address soon (Sebastien says they will) … you cannot search for a post in the list easily. What you can do, however, is show all posts in this list and then use the CTRL-F to find the one you want.
Anyway, once I found those 3 posts, I clicked on them and unchecked the box for allowing comments, then saved each of them.
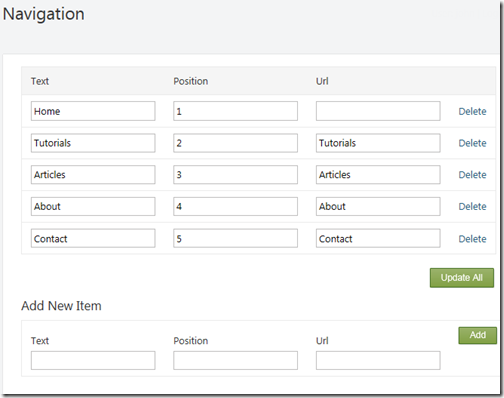
The next step was to add them to the navigation in the site’s header. For this I went to the Dashboard again and selected the Navigation item. I then used the Add New Item section to add menu items for Tutorials, Articles, About and Contact (I’ll get back to Contact in a moment). You can see the setup in the image below.
Once this was done, he navigation items were on my site and they linked to the pages.
Contact Page
I also set up a Contact page in my new site. This was very easy to do. First step I did was to set a navigation link to it, as shown in the previous steps. But of course adding a link to something I have not created is just wishful thinking at this point. So the next step was to add the Contact functionality. Once again this is where modules helped me out.
First, I installed the Contact Us module from the gallery. Then I set it up very quickly and within minutes I was done. Details for this module are explained in Part 1 of this series.
What’s Next?
At this point the blog was up and running locally, but I still had some tweaking to do to customize the look of the site, add widgets, tweak performance, and publish it to my hosted server. But for now, that will wait for the next post.


